I am so excited to share this tutorial today because a) I’m so pumped with how it turned out and b) it was so easy. When things look harder than they actually were, it fires me up! Anyhow, so I’ve been wanting to do an accent wall of sorts behind my bed since I moved in, like six months ago. I was inspired when I saw Lauren Conrad’s office makeover. Is this a surprise?

You can see her full tutorial on her site, but I liked the way it instantly brightened up the space and added a pop interest and suspense. Just by seeing this one wall, I’m dying to see the rest of her office. After all, it’s in this very office that her fashion ideas come to life.
So I wanted this in my own bedroom, since I don’t have an office. But remember, I might be having a storefront soon.. so I’ll have to do it again! I searched for ideas on Pinterest and after I tally vote, I decided to go with a confetti-type look coming from the corner of my wall, like the last photo with the pink dresser (which by the way is so haute!).


Ugh, I need this pink dresser in my room.
I love those old school name plates! So here’s what you’ll need to create this gold dot wall:

Here’s what to buy:
Gold contact paper ($15) – I got mine from here.
Martha Stewart circle cutter ($35) – I got mine from Hobby Lobby with a 40% coupon
Note: Do NOT get a circle punch; these will not cut all the way through. Trust me.
Here’s what you already have:
Cutting board
Cardboard
Scissors
Follow the instructions on the package to set up your cutter. I cut a bunch of strips of the gold paper because it was difficult to do it on the roll because it keep rolling back up on me. Depending on what size dots you want your strips will have to be about that size.


My dots are about 3″. You can see my setting in the picture above. I wanted them to be a lot smaller than Lauren’s. Be very careful and give yourself room for the circle to be cut out. Do not just use the large mechanism in the middle as a guide. Your actual circle size will be using the smaller one. After you cut around, you’ll see the circle. Just punch it out.

Do this until you’ve cut out all your circles. I got 60 in my roll and I used the whole thing. Be careful and not wasteful. Try to get a dot out of every inch of the paper.


Next comes the fun part! Pick a wall that you want to use. Don’t worry about furniture; I didn’t move anything! Here’s a before shot of my headboard wall. It was a little rainy in the ‘Ham yesterday so excuse the poor lighting.


Of course my Mila Bear has to be in every picture. So it’s pretty boring right? As a renter, I do not want to paint because you have to paint it back before you leave. So I figured something like this would be easy to take down; although, I am going to hate taking them down because they are just so pretty!
Figure out your pattern or what you want it to look like and then start peeling and sticking. Luckily, this contact paper is easily removable so if you need to move those dots around you can.
So when you get finished, it’ll look something like this.


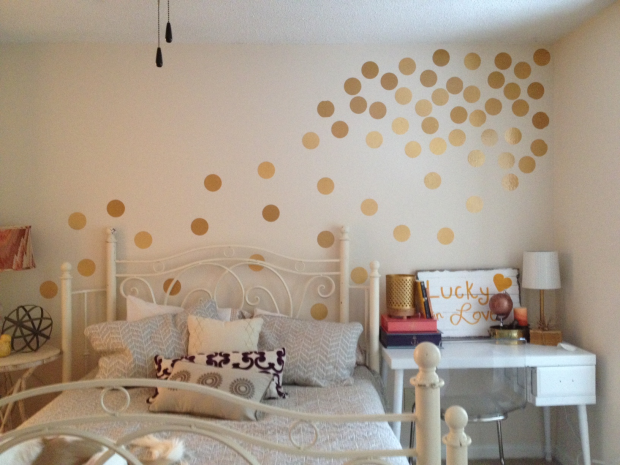
I think that for the money you can’t beat this result. Instantly, my room has a new look and vibe. My dots remind me of pixie dust being blown onto my bed for sweet dreams. I need to find a little fairy and hang it up in the corner! Ha!
Are you going to try this yourself? If so, post pictures when you’re finished so I can see!
Good luck! Happy dotting!